Custom Chocolates Made Easy Using Magnetic Chocolate Moulds
Posted by Nicole Tait on 22nd Feb 2022
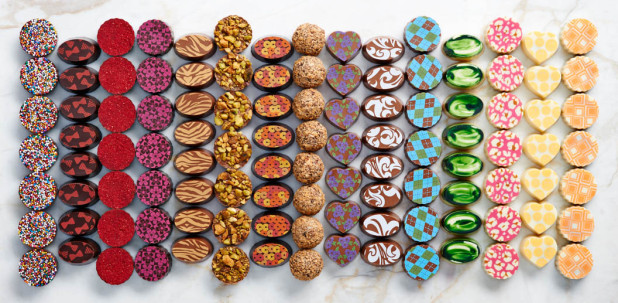
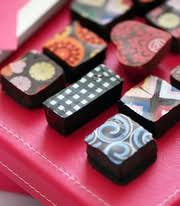
Hand-making your own chocolates for personal use or for your business can be exceptionally satisfying. It can also be frustrating and time-consuming if you don’t have the right tools and know how. Once you’ve mastered chocolate tempering and flavouring the sky is the limit when it comes to how you creatively present your chocolates. A quick and easy way to produce beautifully shaped and decorated artisan chocolates is by using magnetic chocolate moulds which also accommodate printed edible Chocolate Transfer Sheets.
If you already own an Edible Ink Printer, then you’re well on the way to producing beautifully decorated chocolates. Luckily for you at Edible Image Supplies, we not only sell those printer systems we also stock the Chocolate Transfer Sheets and Magnetic Chocolate Moulds that help you to easily create sensational custom chocolates. Detailed below are the simple steps to use our magnetic chocolate moulds in conjunction with chocolate transfer sheets. You can also make your chocolates in our moulds without applying any transfers.
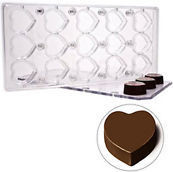
What is a magnetic chocolate mould you ask? Our EIS magnetic chocolate moulds consist of a food grade polycarbonate tray template which couples with a stainless-steel plate, both components being held together with strong magnets. The moulds are available in a variety of shapes. The system is designed so that printed chocolate transfer sheets can be used in conjunction with the moulds to produce an edible printed design on the top of your chocolates. You simply line the bottom of the mould with your printed chocolate transfer sheets, assemble the mould as per our instructions, fill with chocolate and hey presto - your very own custom artisan chocolates!
The Steps (skip steps 1 & 2 if not using transfer sheets):
1. Print your desired image onto your Edible Image Supplies Chocolate Transfer Sheet. Ensure that you print the image onto the sheet in “mirror image” or media type “T-Shirt Transfers” as illustrated below. Preprinted chocolate transfer sheets can also be sourced from various cake supply shops.
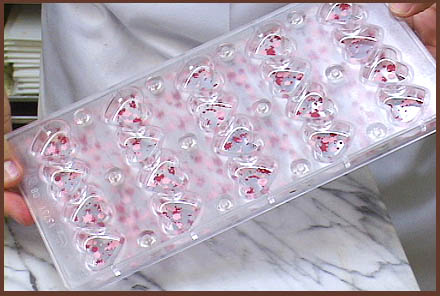
2. Cut the chocolate transfer sheet to the size of the mould using the steel plate as your size guide, then insert the sheet into the mould printed side down. Secure the steel plate in place, over the chocolate transfer sheet then turn the mould over.
3. Pipe tempered chocolate into each of the mould cavities.
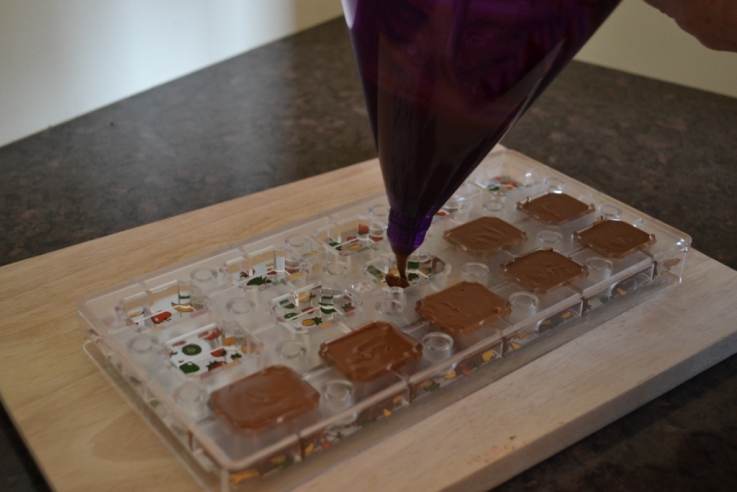
Note: Magnetic Chocolate moulds can also be used to make “filled/centred” chocolates.
4. Gently vibrate the mould to ensure the chocolate is evenly distributed and gently tap to remove any air bubbles. Remove the excess chocolate from the top of the mould with a scraper. Refrigerate for approximately 20 minutes. Once the chocolate has hardened sufficiently it will shrink back slightly from the mould.
5. Remove the backing steel plate from the mould. Remove the transfer sheet, then tap out your chocolates onto your work surface.
6. Hand wash your chocolate mould with mild detergent in warm water and towel dry.
Always ensure your moulds are absolutely free of any water as this will affect your chocolate.
7. Try to resist eating all of your beautiful, custom chocolates immediately.
So, what are you waiting for? Your new chocolate making hobby or product line is only a Magnetic Chocolate Mould order away!